I wonder why some people keep buying new Copic markers, whereas they can refill them without spending any extra money!
And come on! Isn’t it super expensive to buy new ones?
Whether you’re into illustration or sketching anime, a Copic marker does the job ideally. But the problem appears when it starts drying out. (Meaning the coping marker is running out of ink.)

That’s the very time you need to refill the marker without creating a mess!
And to do so today, we’re going to show you the different ways how to refill a Copic marker. Let’s get started and evoke the artist within all of us.
Before Anything Else!
I remember refilling my Copic marker without determining whether it needed It or not. Yeah, I was that silly artist!
The thing is when you try refilling your Copic marker when it doesn’t actually need it, the strokes come out too deep, or sometimes the nib starts dripping ink on the paper. Oops.
That’s why before willing to fill your marker, you need to be sure whether it needs maintenance or not.
There are four common symptoms that tell you it’s time to make a change:
- Step 1:Take a paper or a used rag for using it as a surface. Because while refilling the ink, drips might spook out, and the spills can ruin your floor, bed, sofa, table, or any neat surface.
- Step 2:Then, take the ink bottle and Copic marker at the same time and remove the caps.
- Step 3: After removing the caps, keep the Copic marker straight with your dominant hand and start dripping the ink into the nib slowly.
- Step 4: Make sure you don’t put so much pressure on the refill bottle as larger drops can create spills. Be patient and focused throughout the whole process.
So, these are the four common symptoms to determine the need for refilling.
Sometimes you bring a lot of refill bottles thinking that you might paint a lot, and the marker can run out of ink in no time.
But in reality, you need only a few refilling bottles according to your color preference and type of illustration.
One refill bottle can usually last for a whole year. However, while buying ink bottles, you really shouldn’t worry about the price since you aren’t going to need them anytime soon.
How to Refill a Copic Marker- 3 Different Ways!
Refilling Copic markers can be a tight job for the dummy artists as it requires a firm hand, enough patience, and time. Also, mastering the tricks and hacks takes ample practice and effort.
Still, with proper knowledge and a clear vision, you can cut the chase even if you are refilling for the first time.
Now there are different ways to refill your Copic marker. And no doubt choosing your type depends on your personal preference and comfort though all of them are adaptive.
Now, without further ado, let’s reveal the 3 different ways of refilling your coping marker.
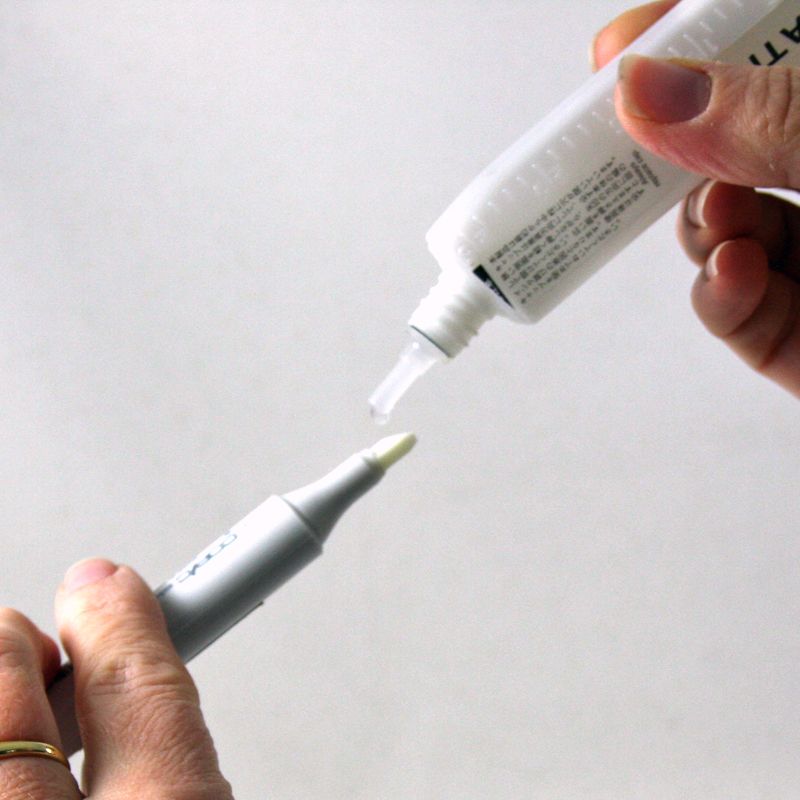
1. The Overrated Refilling Style- Drip the Ink
The reason I named it “overrated” is that you’re gonna see this method literally everywhere, and every single artist has done that even for once in their journey.
So, basically, this one is called the dripping method. One of the core aspects of preferring this one over anything else is because it doesn’t need any additional attachments. Just the ink bottle and your Copic marker!
Now, to start with the procedure, you’re gonna consider some facts.
First thing first, you need to buy the exact same color ink you’d earlier.
Because sometimes, you expect to try different colors for making the piece more vibrant, so instead of refilling the same color, you insert a different color inside.
Do you know what happens next?
For instance, if you had a red-inked marker before and then you refill it with yellow ink, eventually, you’re going to have an orangish color.
Because red and yellow makes orange. Even if the marker runs out of ink, it still bears some leftover color which later mends with another color.
That’s why while purchasing refill bottles, make sure to buy the exact colored Copic marker.
Secondly, you need to determine the length of your Copic marker. Why?
See refill bottles that arrive in different sizes and shapes. Gladly most of the bottles are transparent so you can see how much is left after use.
Anyways, determining the marker’s measurement will help you to ensure how much ink you should inject.
Now after these, start with the refilling process step by step:
- Pale nib
- Inadequate Coloring
- Dry nib
- while running through the marker, it makes a squeaky sound
When to Stop?
You might feel puzzled as you can’t see through your Copic marker. As a result, you won’t understand whether it’s filled or not.
Here to minimize this problem, you need to go back to the measurement thing.
Remember I mentioned about knowing the length of your Copic marker?
When you are aware of the length, you can determine whether it’s filled or not because the refill bottles appear with measurement scales on their bodies.
So, you can simply note how much dashes of ink you are putting inside and when the dashes meet with the length approximately, you know it’s done!
Another effective way is to open the other end of the marker and wait till it starts dripping out! When you notice ink dripping from the opposite edge, you gotta be sure that your Copic marker is now filled with ink!
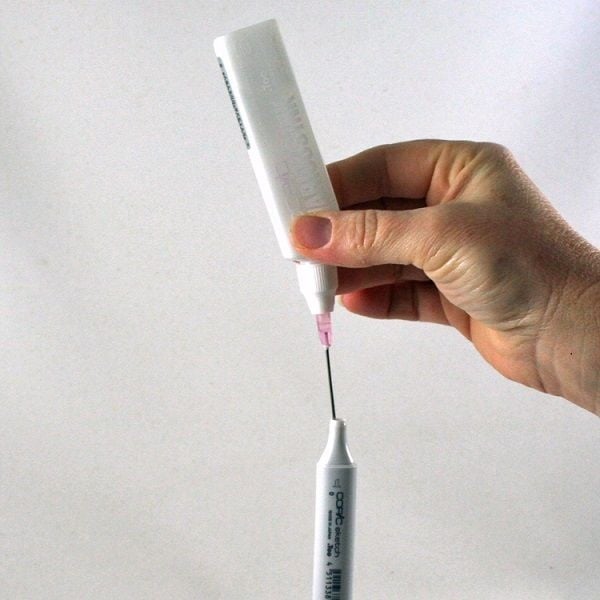
2. The Unpopular Way- Booster Method
Usually, people don’t use a booster for refiling Copic markers. But professional artists think it’s the easiest way to refill ink without having any fear of spills.
Let me tell you why they think that way.
Basically, a booster comes with a pointy needle so that it can easily go inside the marker nib.
Hence, when you inject the needle inside the marker nib accurately and squeeze the ink bottle creating pressure by your palms, the ink falls into the right place as the needle is inside.
Now to start with that process, you need to have 5 ingredients:
- Hand gloves
- A paper as a surface
- Ink refill bottle
- Cotton bud
- Nail polish remover
After having all these in your hands, follow this refilling direction step by step:
- Step 1: Start with wearing gloves so that you can insert the needle without any injuries and to keep your hands out of ink spills.
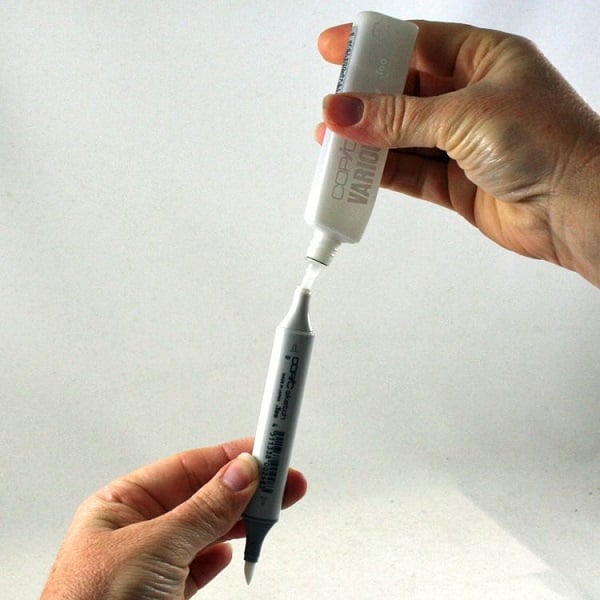
- Step 2:Now, take the booster needle and stab it on the refill bottle. To open the refill brush, you can use a tweezer.
- Step 3:After inserting the needle in the ink bottle, take your Copic marker and remove its cap. Make sure you are inserting the refill booster on the opposite edge of your marker. Then hold the refill bottle and your coping marker firmly.
- Step 4:Now start squeezing the refill bottle with a bit pressure and let the ink drip properly into the Copic marker.
When to stop?
Here to understand when to stop, you need to know about the indications such as 1 or 1.5 cc. Usually, your Copic marker comes with an instruction manual, which says how much cc ink you’re gonna require.
If not, then you can go with the standard amount, which is 1-2 cc for each.
When you are done with refilling, use the tweezer again to remove the needle gently; otherwise, it can create bigger holes.
Afterward, clean the booster needle and the refill bottle cap using a cotton bud soaked into nail polish remover.
Oh! I forgot to mention about using a paper-like surface. It’s a must if you’re not expecting any mess!
3. The Easiest Way- Pull out The Nib!
Now this one is the easiest way and ideal for lazy lads like me. You just need to proceed with 2 easy steps!
Step 1: Pull out the nib with a tweezer.
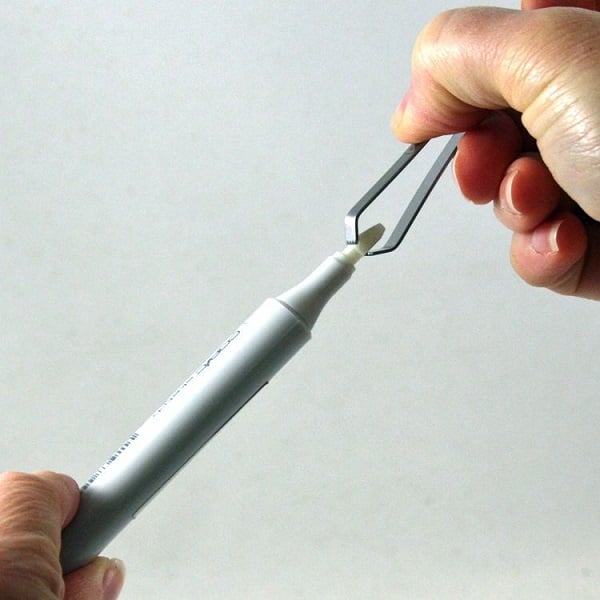
Step 2: Refill it with the ink. You can see through it to ensure the refilling.
Now you can ask why people usually don’t do that. Well, this one bears some risk as pulling out the entire nib sometimes damages the smoothness and edges pattern. So, when you drag a line, it may not look the same as it was before.
But as I mostly use it for finishing and dragging border lines, a slightly messy nib doesn’t affect my sketch though there are nib tweezers specifically crafted for pulling out nibs without causing any harm.
So, you are out of fear from now on, I guess!
Another thing you need to keep in mind while following this process is that you would want just to refill it or change the entire nib.
Sometimes, while changing the entire nib, this refilling process becomes the most effective way for alteration and refilling both. In other cases, try to stick with the other 2 ways I mentioned above!
Note: Don’t mess with the nib, which is placed in the end edge of your marker. Try to stick with the chisel nib.
Alright! We are done knowing the different ways!
Basic Care of Copic Markers- Know about Maintenance!
Do you wanna know how to make Copic markers durable? Surely, you do. Because changing it requires extra sweat. But honestly, there’s nothing to feel intimidated when it comes to taking care of your favorite Copic markers.
Now I am gonna talk about 3 ways about how you can take basic care of Copic markers and make them have a long run!
1. Storage:
I am pretty sure you store your Copic markers into a toolbox, or you simply tuck them into your stationery pouch.
What if I say that you are ridiculously doing that wrong, and it directly affects the consistency of your Copic marker’s ink.
So, what you’re gonna do?
To store them in the correct order, you need to keep them horizontally or vertically if it’s a dual-tipped Copic marker. Still, you need to consider your craft room situation and your organization preferences.
But professional artists recommend keeping them vertically as the ink meets the nib straightly in that angle so that you are always ready for action. Otherwise, you might have inconsistent coloring while dragging a line.
2. Nudge the Cap Tightly:
Don’t ever forget to leave your Copic marker without attaching the cap as the nib may get dry due to evaporation. That’s why always try to nudge the marker cap tightly after sketching.
3. Refilling:
Here comes the refilling. Well, you already know how you’re gonna do that, and refilling is one of the core parts of maintenance.
Now it really depends on your usage. If you are a real artist or let’s say you are a sketching maniac, then your Copic marker can run out of ink faster than anyone out there.
In that case, you should always look after the 4 symptoms where you know whether you need refilling or not, which are pale coloring, dry nib, squeaky sound, and inadequate coloring.
Just after you realize that your marker needs refilling, don’t linger your time and start refilling.
Sometimes, you are away from home, or you may take a break from art and crafts, so you aren’t supposed to know whether your markers need refilling or not.
As a result, when you come back and intend to use them, the nibs seem dry.
In that case, you can drip a few drops of ink into the nib or take a rough paper and draw some criss-cross lines to make the lines smooth and consistent.
4. Changing the Nib:
It’s the last step of your Copic marker’s maintenance.
Also, this is the last decision you’re gonna take because changing nib isn’t necessary unless it becomes properly dry and damaged.
Hence, before changing the nib, take a paper and drag some lines to check the consistency. Furthermore, if the nib remains dry even after dripping ink inside, then you must change the nib.
Make sure purchasing the same sized and colored nib while altering.
Decode the Coping Marker Numbering System
I am pretty sure that you often get confused about the letter and numbers of the Copic marker. So, here I am going to narrow down their meaning and how to use them to pick good blending groups.
Each of the numbering systems includes the name of the color as well.
Now there will be letters as in B, G, Y extra, and these stand for the first letter of their color as B for blue, G for green, and Y for yellow.
Besides, you are gonna notice BG- Blue-green, YG-yellow-green, RB-Redviolet. These indicate two combined colors.
Next, you will see numbers like BG13 or YG14; here, the first number stands for the amount of saturation and purity.
The higher the number, the less saturated and less pure it is.
Here the first number is 1 that means it’s highly saturated and pure as the less the number, the higher saturated and pure it appears.
Also, you can check them on a plain paper for determining the vibrancy of these colors. The numbering starts at 0 and ends at 9. No doubt, number 9 is relatively less vibrant than all of them.
Now let’s move forward to the second number from BG13, which is 3. And this number represents the value or shade of the color.
It simply informs you how much deep or light the shade will be.
Equivalently, here the number starts and ends at 0-9. When you talk about the value or shade of the color, the lower the number, the lighter the shade and vice versa.
Voila!
I guess now you can easily choose your preferred colors without any confusion and mistake.
For fashion illustration, always try to stick with the vibrant and high saturated colors. But if you are willing to sketch manga or anime, then a Copic marker with dark color ink and chisel nib will be appropriate.
Copic Marker Hacks
Well, here I am gonna talk about two unpopular Copic marker hacks. Number 1 is blending and the second one is using a bleed-free paper.
Firstly, let’s talk about blending. When you take a neat paper and drag a light color line using your Copic marker, you can also use another darker or lighter shade of the same color along with the first color.
These two colors will blend easily and create a whole new high contrast color and give you a natural and soulful texture.
Secondly, we have a bleed-free paper. Now bleed-free paper means a paper that absorbs the color significantly without leaving any stain on the other side.
Using bleed-free paper is better than any expensive sketchbook paper. You can also fold an ordinary paper for making it bleed-free while dragging any line.
Check Our Top 15 Copic Marker Papers Review
Parting thoughts….
Alright, that was a lot of information! Hopefully you walked away with some hacks and ways to refill your Copic markers and much more in-depth information as well.
Don’t forget to share your go-to Copic marker hacks and refilling style.
However, before purchasing Copic markers, make sure you’re well aware of your sketching preferences.
Choose the nibs according to your illustration style! Happy coloring!